Contents
- Introduction
- Configuring Xero Organization
- Enabling The Integration
- Syncing Data
- Notes On the Integration
- FAQ
- Common Issues and Fixes
Introduction
Xero integration provides a way to sync your sales, inventory transactions, and house account transactions to your Xero account.
It makes one sales invoice for each branch in each day. Each invoice will have associated payments based on your payment methods.
For inventory, a bill, credit note, or a journal entry is created depending on the inventory transaction type.
For house account transaction, a journal entry is created
This guide helps you to setup and run the integration with Xero
Configuring Xero Organization
The integration requires you to do mapping between Foodics and Xero for certain entities.
This can be done by creating resources in Xero then link them to Foodics Xero Integration in the integration settings page
We recommend that you first create all needed resources in Xero before enabling the integration and starting doing the mapping
Follow bellow points for detailed explanation on each mapping section
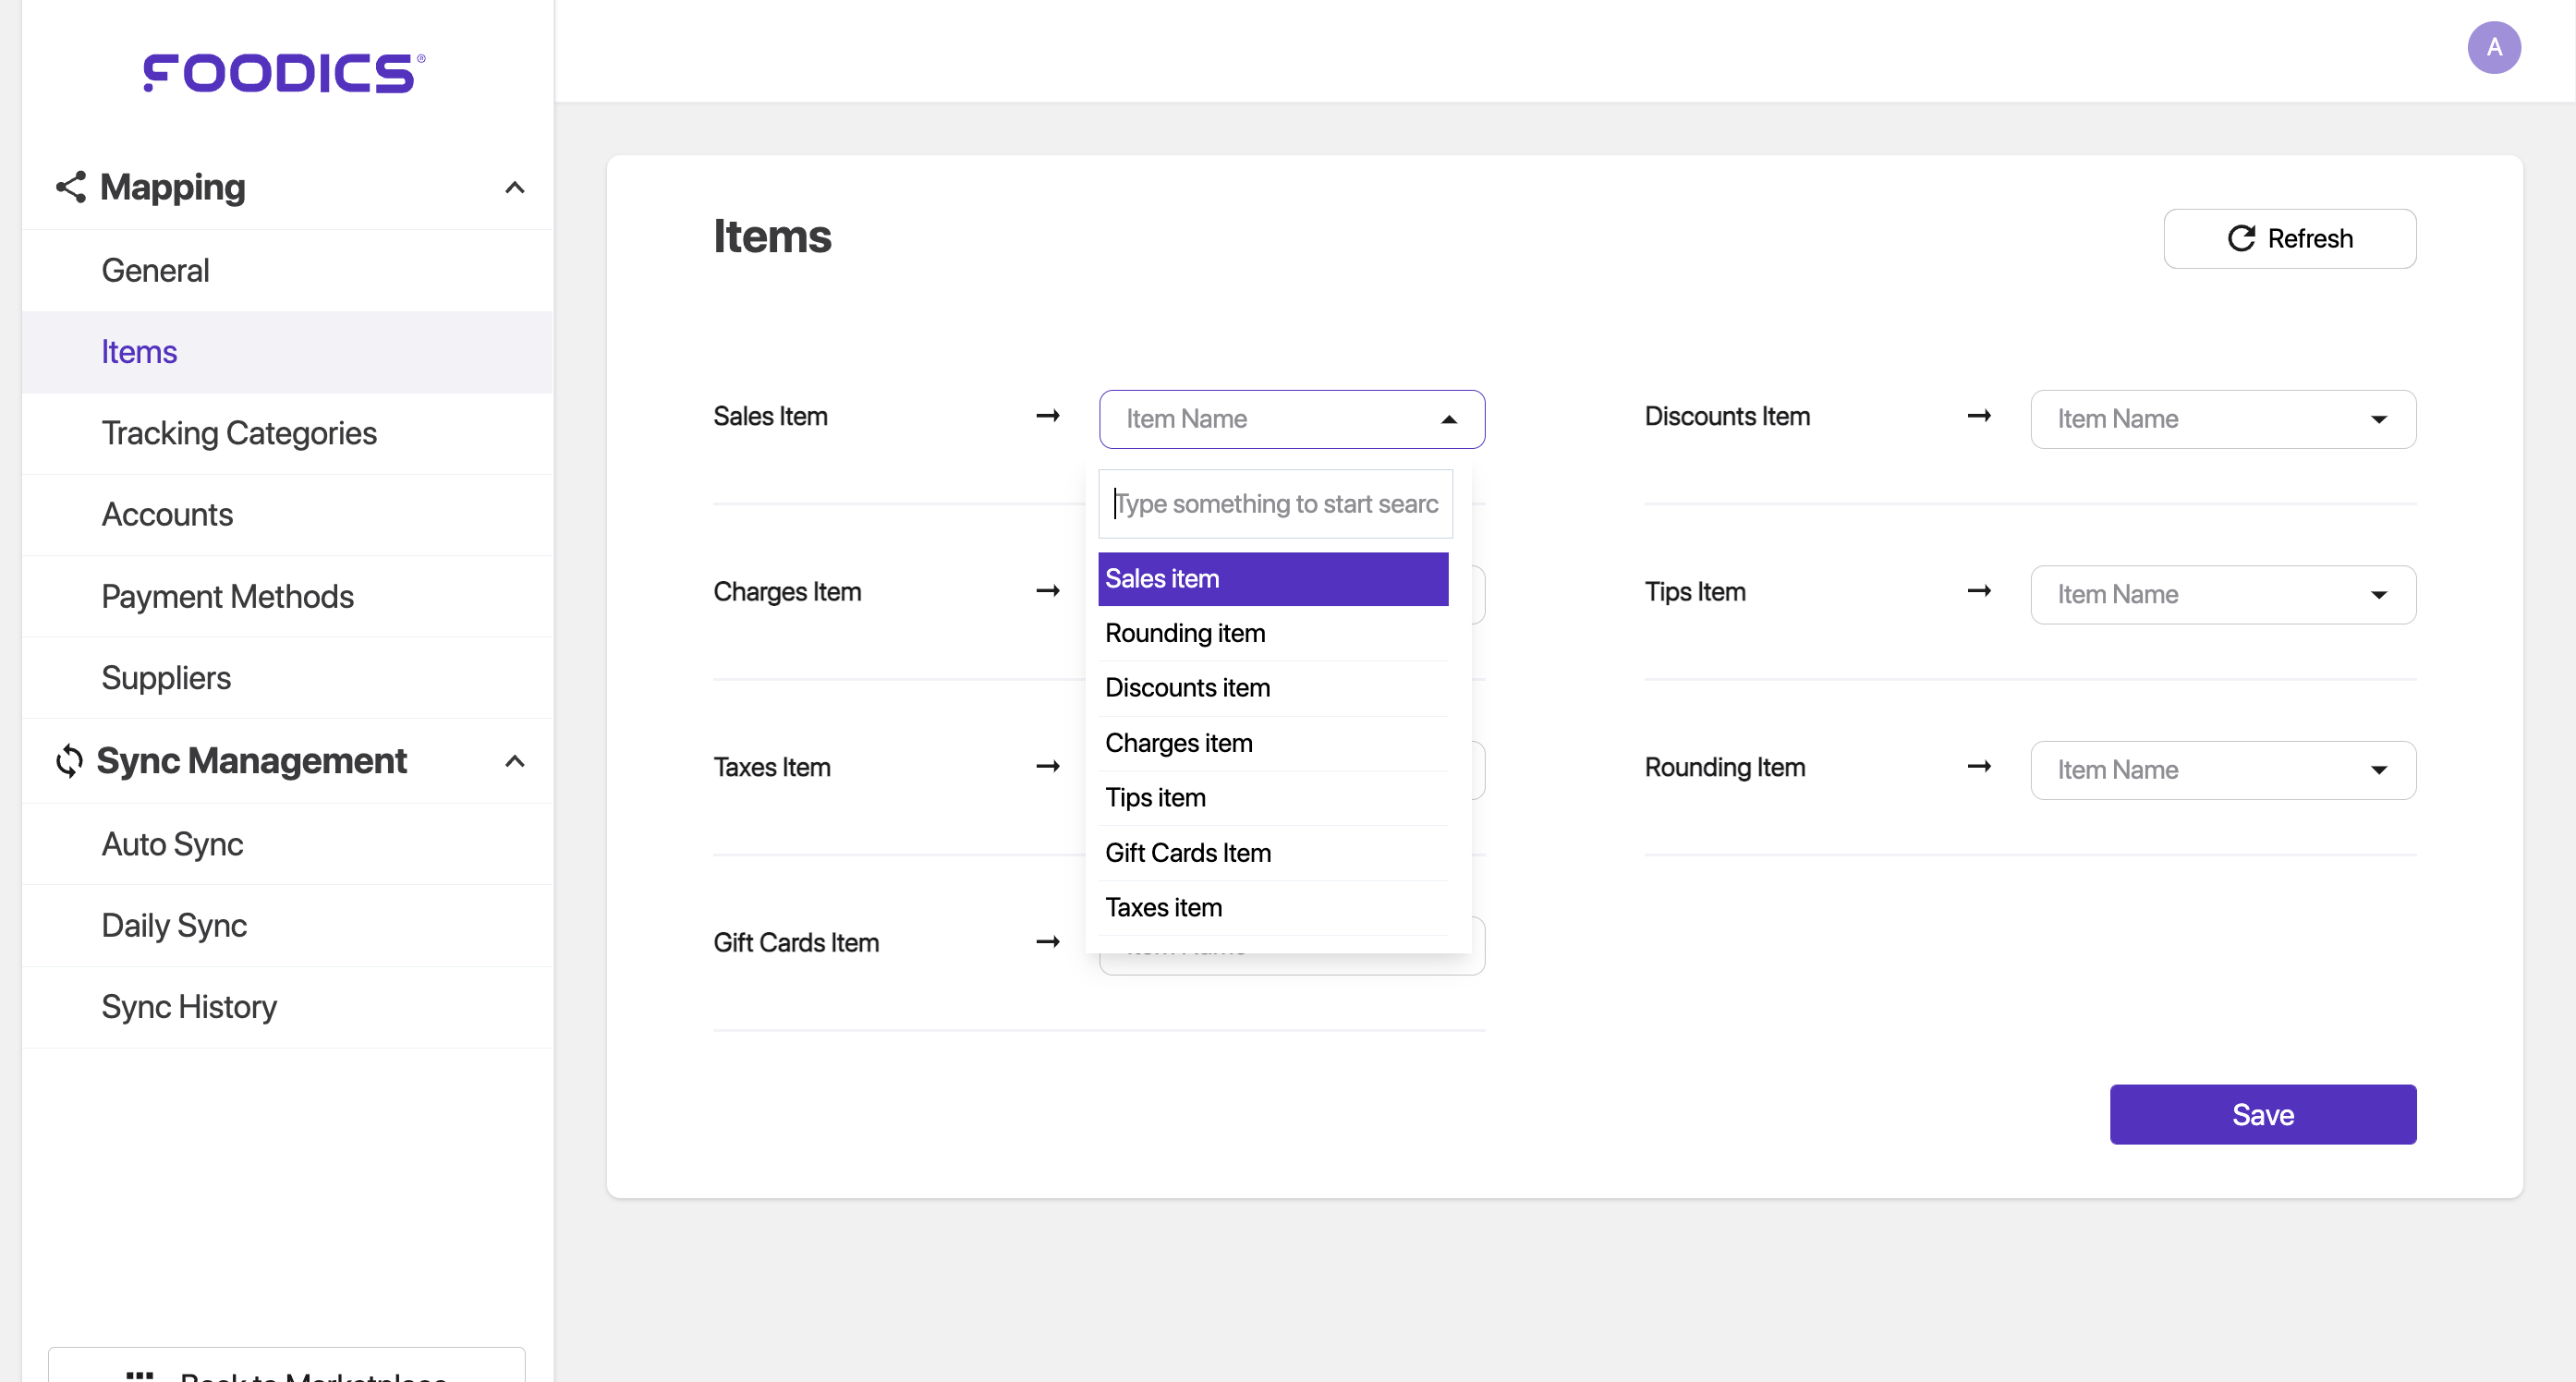
Items
When you sync sales from Foodics to Xero, the sync creates an invoice in Xero. The invoice contains Items
You need to map these items in order for the integration to know where to send the sales data
The invoice items are:
- Sales Item: holds the total amount of net sales
- Charges Item: holds the total amount of charges
- Tips Item: holds the total sum of tips
- Rounding Item: holds the total amount of rounding
- Taxes Item: holds the total amount of taxes
- Discounts Item: holds the total amount of discounts
- Gift Cards Item: holds the net amount of sold and used gift cards
Creating The Items in Xero
1- Log in to Xero dashboard
2- Go to Business --> Products and services --> New Item
3- Fill the Item Code and Item Name. Check the box I sell this item, and make sure to select a Sales Account. Below is a sample

Click to Zoom
4- Don't enter a unit amount, don't select a tax rate, and don't check the I track this item box
5- Click Save
6- Do the same for each item in the integration settings
Note: If you didn't select a Sales Account, the integration will not be able to create invoices
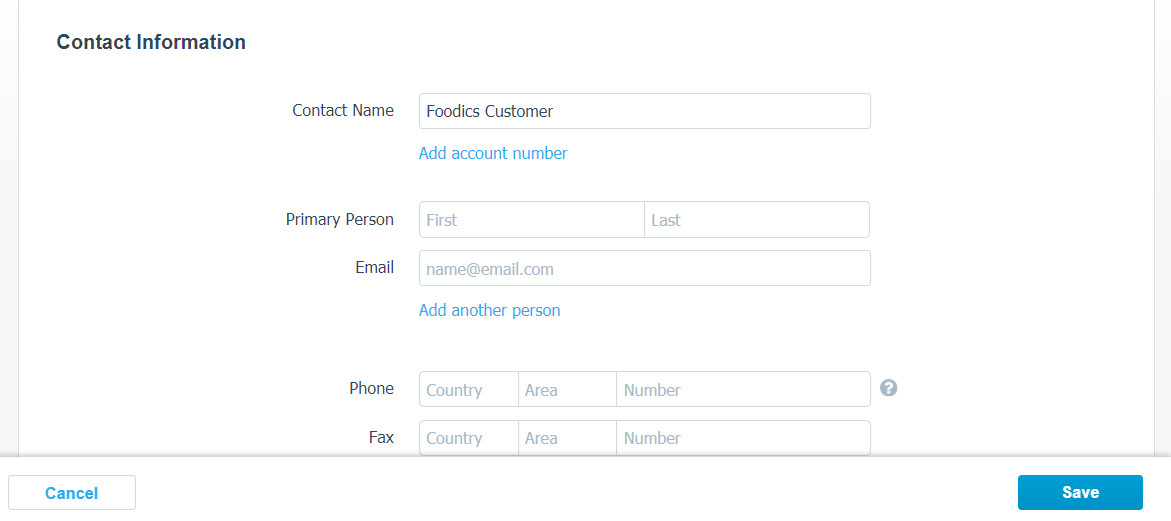
Default Customer
It is a requirement of Xero that each invoice must have an assigned contact. You should create a default contact to be assigned in the invoices generated by the integration
Creating Contact in Xero
1- From Xero dashboard --> Contacts --> New
2- Enter a contact name as illustrated in below image
Click to Zoom
3- Save
Suppliers
Suppliers are contacts used for bills in Xero. You should create one supplier in Xero for each supplier in Foodics. These suppliers are used when mapping purchasing transactions to bills.
To create contacts for Foodics suppliers, please follow the same steps for default customer
Tracking Category and Options
Tracking categories is Xero way to separate entries per branch. You should create a tracking category e.g. 'Branches' and create an option for each branch and warehouse.
Later you can filter reports by tracking category options
Creating Tracking Category and Options in Xero
1- From Xero dashboard --> Accounting --> Advanced --> Tracking Categories
2- Click on Add Tracking Category
3- Give it a name, then add a category option for each branch/warehouse you have in Foodics as illustrated in below image
![]()
Click to Zoom
4- Save
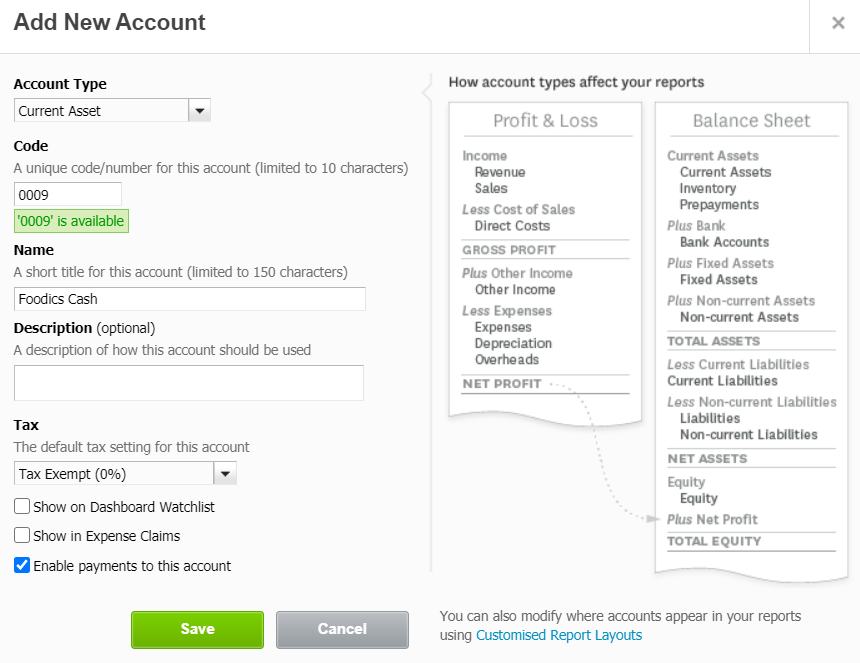
Payment Accounts
You should create one account for each payment method defined in the dashboard. The payment accounts should either be a bank account or a normal account
1) Creating Payment Accounts in Xero
1- From Xero dashboard --> Accounting --> Chart of accounts
2- Click Add Account
3- Select an Account Type, give it a unique Code, add a Name to it, and make sure to select Enable payments to this account as illustrated in below image
Click to Zoom
4- Save
Note: if you didn't select the option Enable payments to this account for payments accounts, the integration will not be able to sync payments
2) Creating Bank Accounts in Xero
1- From Xero dashboard --> Accounting --> Bank accounts
2- Click Add Bank
3- Select an Account Type, give it a unique Code, add a Name to it.
Inventory Accounts
These accounts are used for bills and journal entries as described in the Inventory Entries section. None of these accounts should have account type Inventory because this type is used internally by Xero. If you used an account with type inventory, the integration will not be able to send data to that account and error will occur
The inventory accounts are as below:
- Inventory: Stores the cost of all inventory items
- Cost of goods sold: Stores the cost of consumed inventory items
- Inventory adjustment: Stores the cost of lost/damaged/wasted inventory items
- Pending transfers: Stores the cost of inventory items that are pending receiving. When you transfer items from branch A to branch B, items that are not yet received by branch B will be stored in this account
- Tax account: Stores the taxes paid in purchasing transactions
Creating Inventory Accounts in Xero
1- From Xero dashboard --> Accounting --> Chart of accounts
2- Click Add Account
3- Select an Account Type, give it a unique Code, add a Name to it
Note: Make sure account type is NOT Inventory
4- Save
Inventory Entries
Cost Adjustment:
If new cost is higher than old cost:
- Credit: inventory adjustment account
- Debit: Inventory account
If new cost is lower than old cost:
- Credit: Inventory account
- Debit: inventory adjustment account
Inventory Count
If variance quantity is positive (new item quantity is higher than original item quantity):
- Credit: inventory adjustment account
- Debit: Inventory account
If variance quantity is negative (new item quantity is lower than original item quantity):
- Credit: Inventory account
- Debit: inventory adjustment account
Quantity Adjustment
- Credit: Inventory account
- Debit: inventory adjustment account
Consumption from Orders Transactions:
- Credit: Inventory account
- Debit: Cost of goods sold account
Transfer Out:
- Credit: Inventory account
- Debit: Pending transfer account
Transfer In:
- Credit: Pending transfer account
- Tracking option: sender branch
- Amount: all sent cost
- Debit: Inventory account
- Tracking option: receiver branch
- Amount: received cost
- Debit: Inventory adjustment account
- Tracking option: receiver branch
- Amount: variance (lost) cost
Waste from Orders
- Credit: Inventory account
- Debit: Inventory adjustment account
Return from Orders:
- Credit: Cost of goods sold account
- Debit: Inventory account
Enabling The Integration
Please ensure you have configured your Xero organization as shown Here before enabling the integration
Follow below steps to enable the integration
1- Sign in to your Foodics account at console.foodics.com/login
2- Navigate to Marketplace page --> Search for Xero under Accounting --> Click Install
3- Foodics will ask for your permission
Click Authorize App To Access My Account to proceed
Click Cancel Authorization if you want to cancel the process
4- After clicking Authorize App To Access My Account, you will be taken to Xero to connect to your Xero organization
5- Sign in to Xero if not already signed in, select Xero organization that you want to connect to (in case you have more than one Xero organization)
6- Click Allow Access
7- You will be taken to the integration settings page as shown below, where you can configure and use the integration
Click to Zoom
Doing the Mapping
After creating all the needed resources in Xero as explained above, go to the integration settings page
1- For each section, e.g. Items, click Edit on the top right of the section
2- For each object in the section, click on the box against it
3- Select the appropriate resource from Xero, e.g. Foodics Sales item will be linked to the Sales item you created in Xero
4- Do this for all objects, DON'T leave any object with no mapping (empty box)
5- Click Save
Note:
- If you kept an object with no mapping (empty box), the integration will not be able to send data
- If you would like to only synchronise your sales from Foodics to Xero you dont have to map any inventory related feilds (inventory accounts, warehouses & suppliers).
Syncing Data
After doing all the needed mapping, you can now sync data with Xero
The sync section is available in the integration settings page. You can access the integration settings through This Page, you can add it in your browser favorite bar for easier and quicker access
The sync is divided into there sections, Sales Sync, Inventory Sync, and House Account Sync
Notes on Sync:
- The sync can be done for a single business date at a time, you
can'tselect a date range - You can select to sync all branches at once, or sync specific branches
- House account sync is done for all branches by default
The sync section is available at the bottom of the settings page as shown below

Sales Sync
The Sales Sync will create an invoice in Xero for each branch in Foodics, so if you have three branches in Foodics and all have sales on the selected business day, the integration will send three invoices to Xero
The invoices are sent with payments and the payments are directly deposited to their mapped accounts, no manual action is needed in Xero dashboard
Inventory Sync
When syncing inventory, the integration creates
- A bill for each Purchasing transaction made in Foodics. The bill will contain the supplier in Xero that is mapped to the supplier in Foodics
- A credit note for each Return to Supplier transaction
- Manual Journals for all other inventory transactions
Note on Bills and Credit Notes:
Bills and Credit Notes are sent to Xero in Awaiting Approval status, you need to log in to Xero and Approve them, then Pay/Refund them in order to reflect them on your accounts. This is done to give you a chance to review the Bills and Credit Notes before closing them
Note on Manual Journal:
Manual journals are sent to Xero in Draft status, you will need to log in to Xero and Post them manually in order for these manual journals to reflect on your accounts. This is done to give you a chance to review the entries before posting them
House Account Sync
Note: you can skip this sync if you don't use House Account in your business
When syncing house account, if there is a payment against house account for the selected day, the integration sends manual journals to Xero as below
- Credit: House Account payment account
- Debit: The used payment method account
Sample
A customer owes you 150 SAR on his house account, the customer came and paid 100 in Cash and 50 in credit card, the integration will send a manual journal with the following
- Credit: House Account payment account for 150 SAR
- Debit: Cash payment method account for 100 SAR
- Debit: Credit card payment method account for 50 SAR
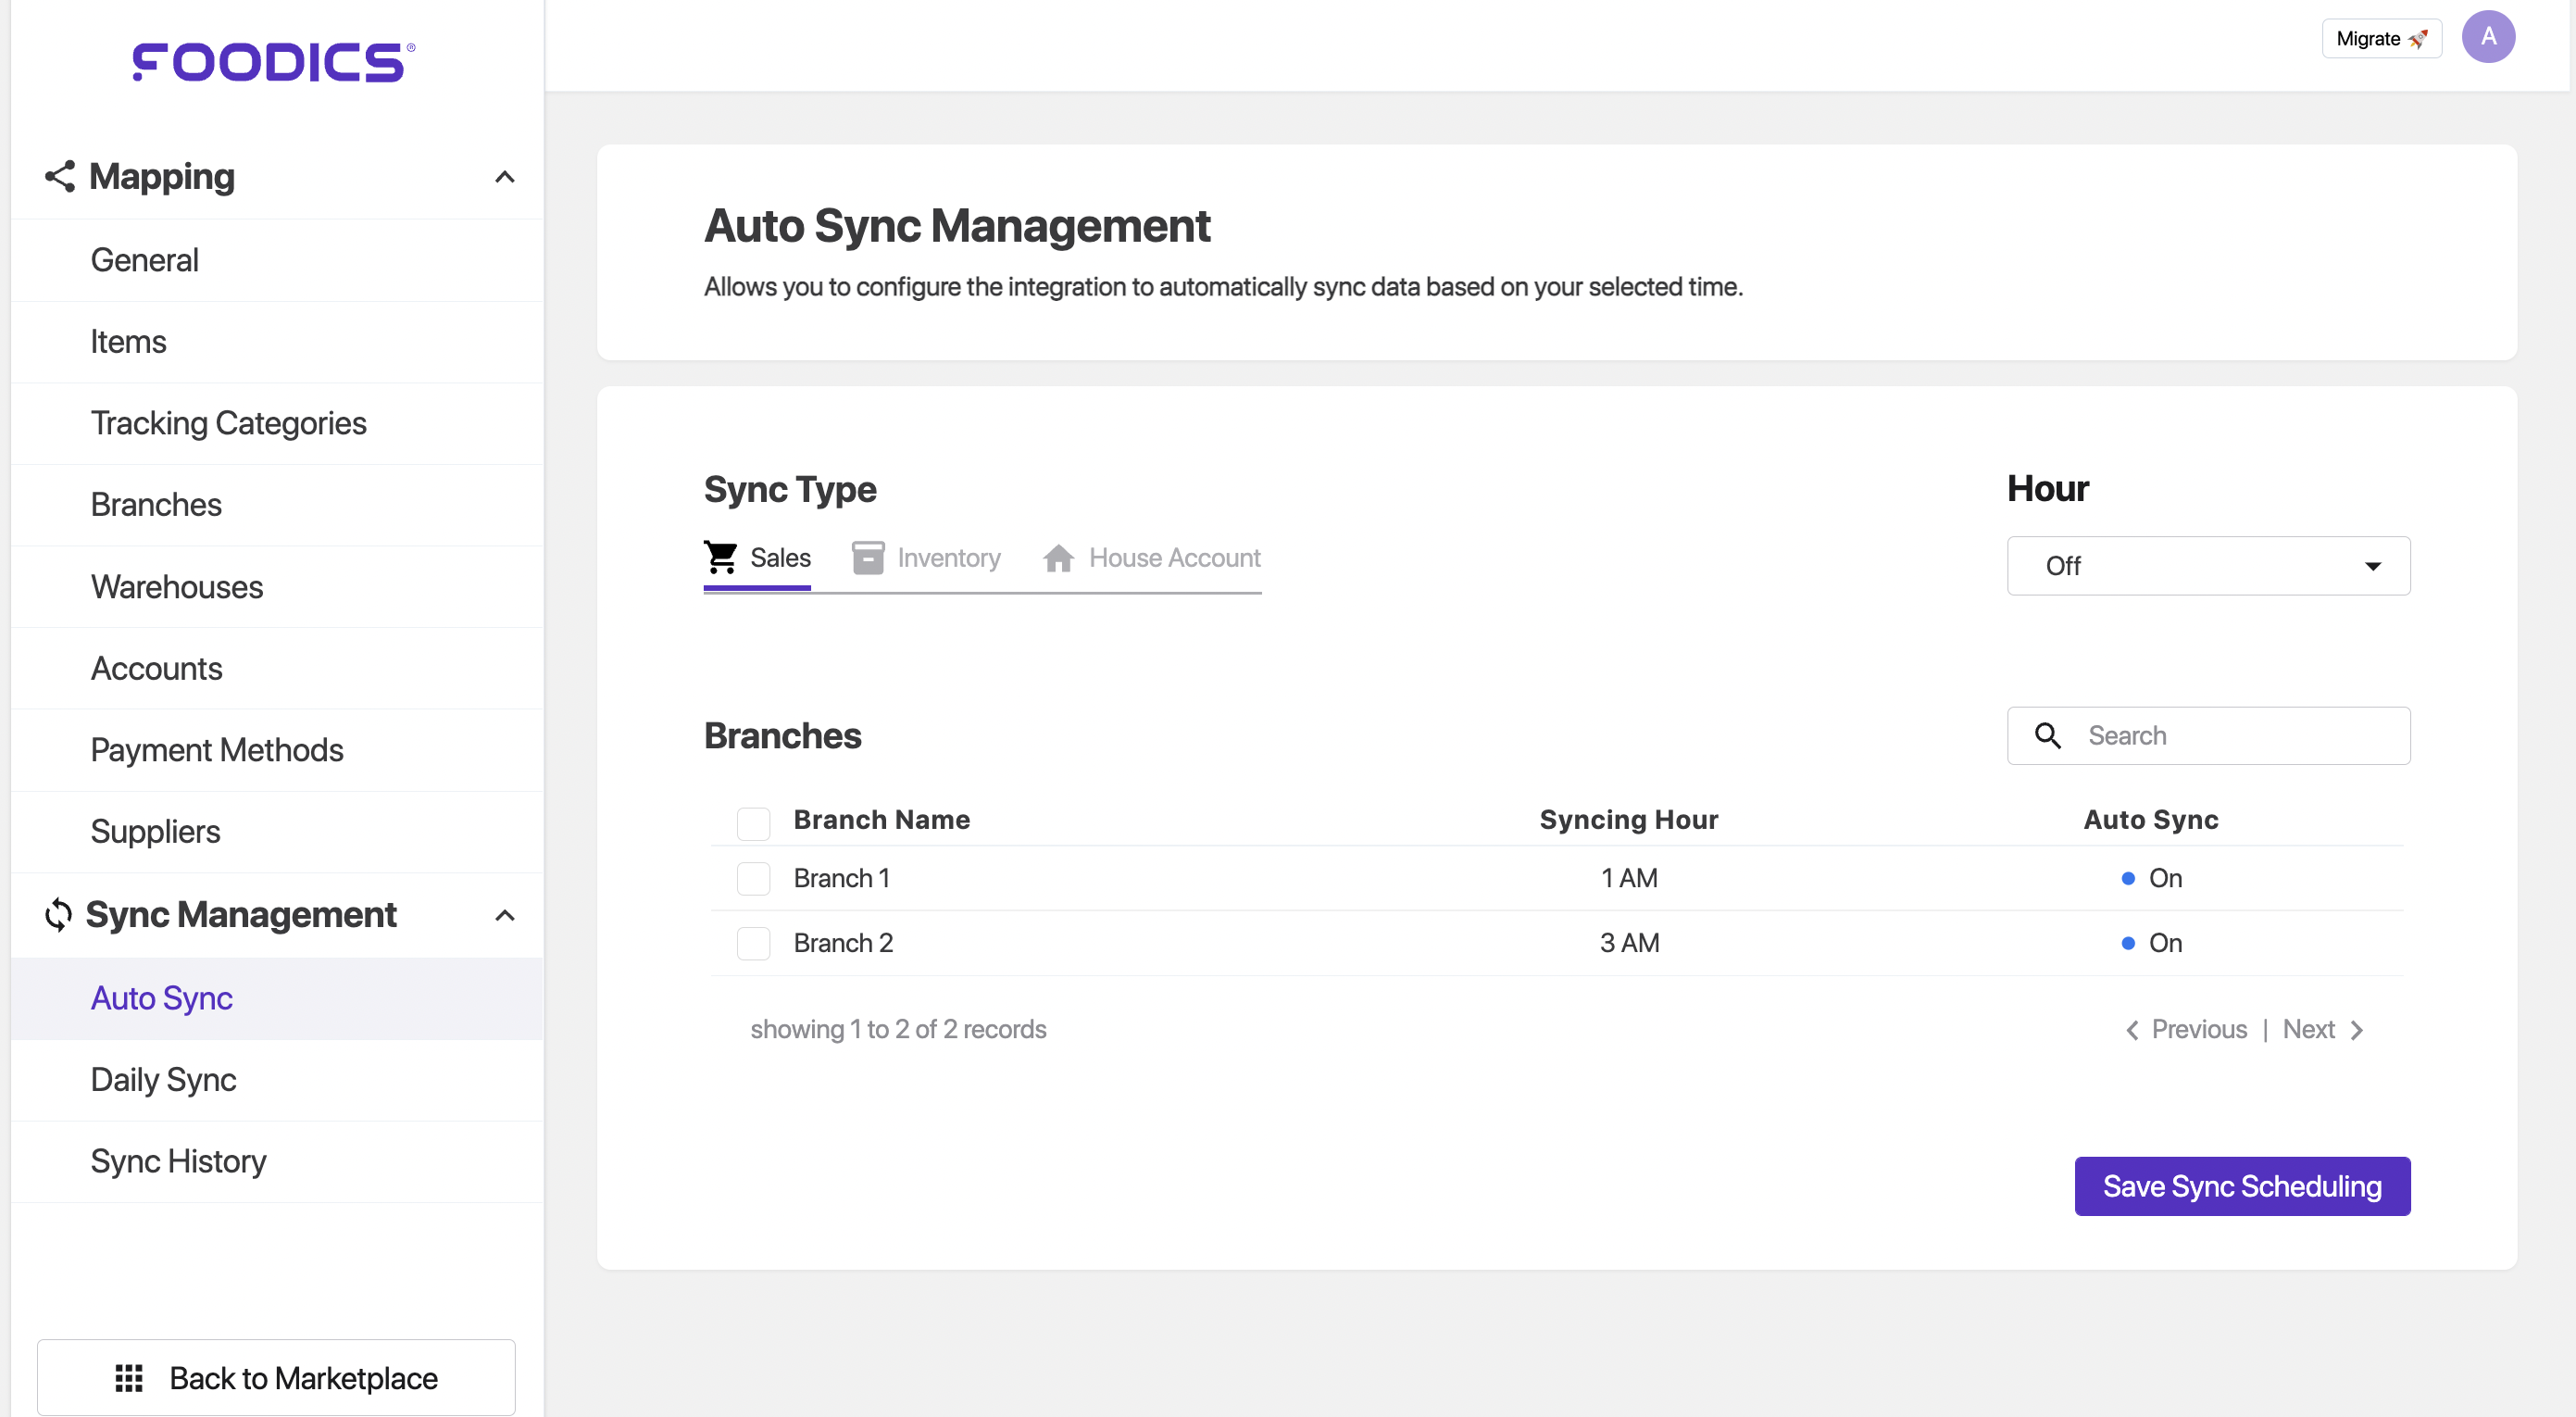
Auto Sync
Allows you to configure the integration to automatically sync data based on your selected time.
To setup the auto sync follow the below steps:
- go to the integration page
- navigate to auto sync
- select the
Sync Typeand select the branches - on the top right set the hour that you want to sync the at
- click save.
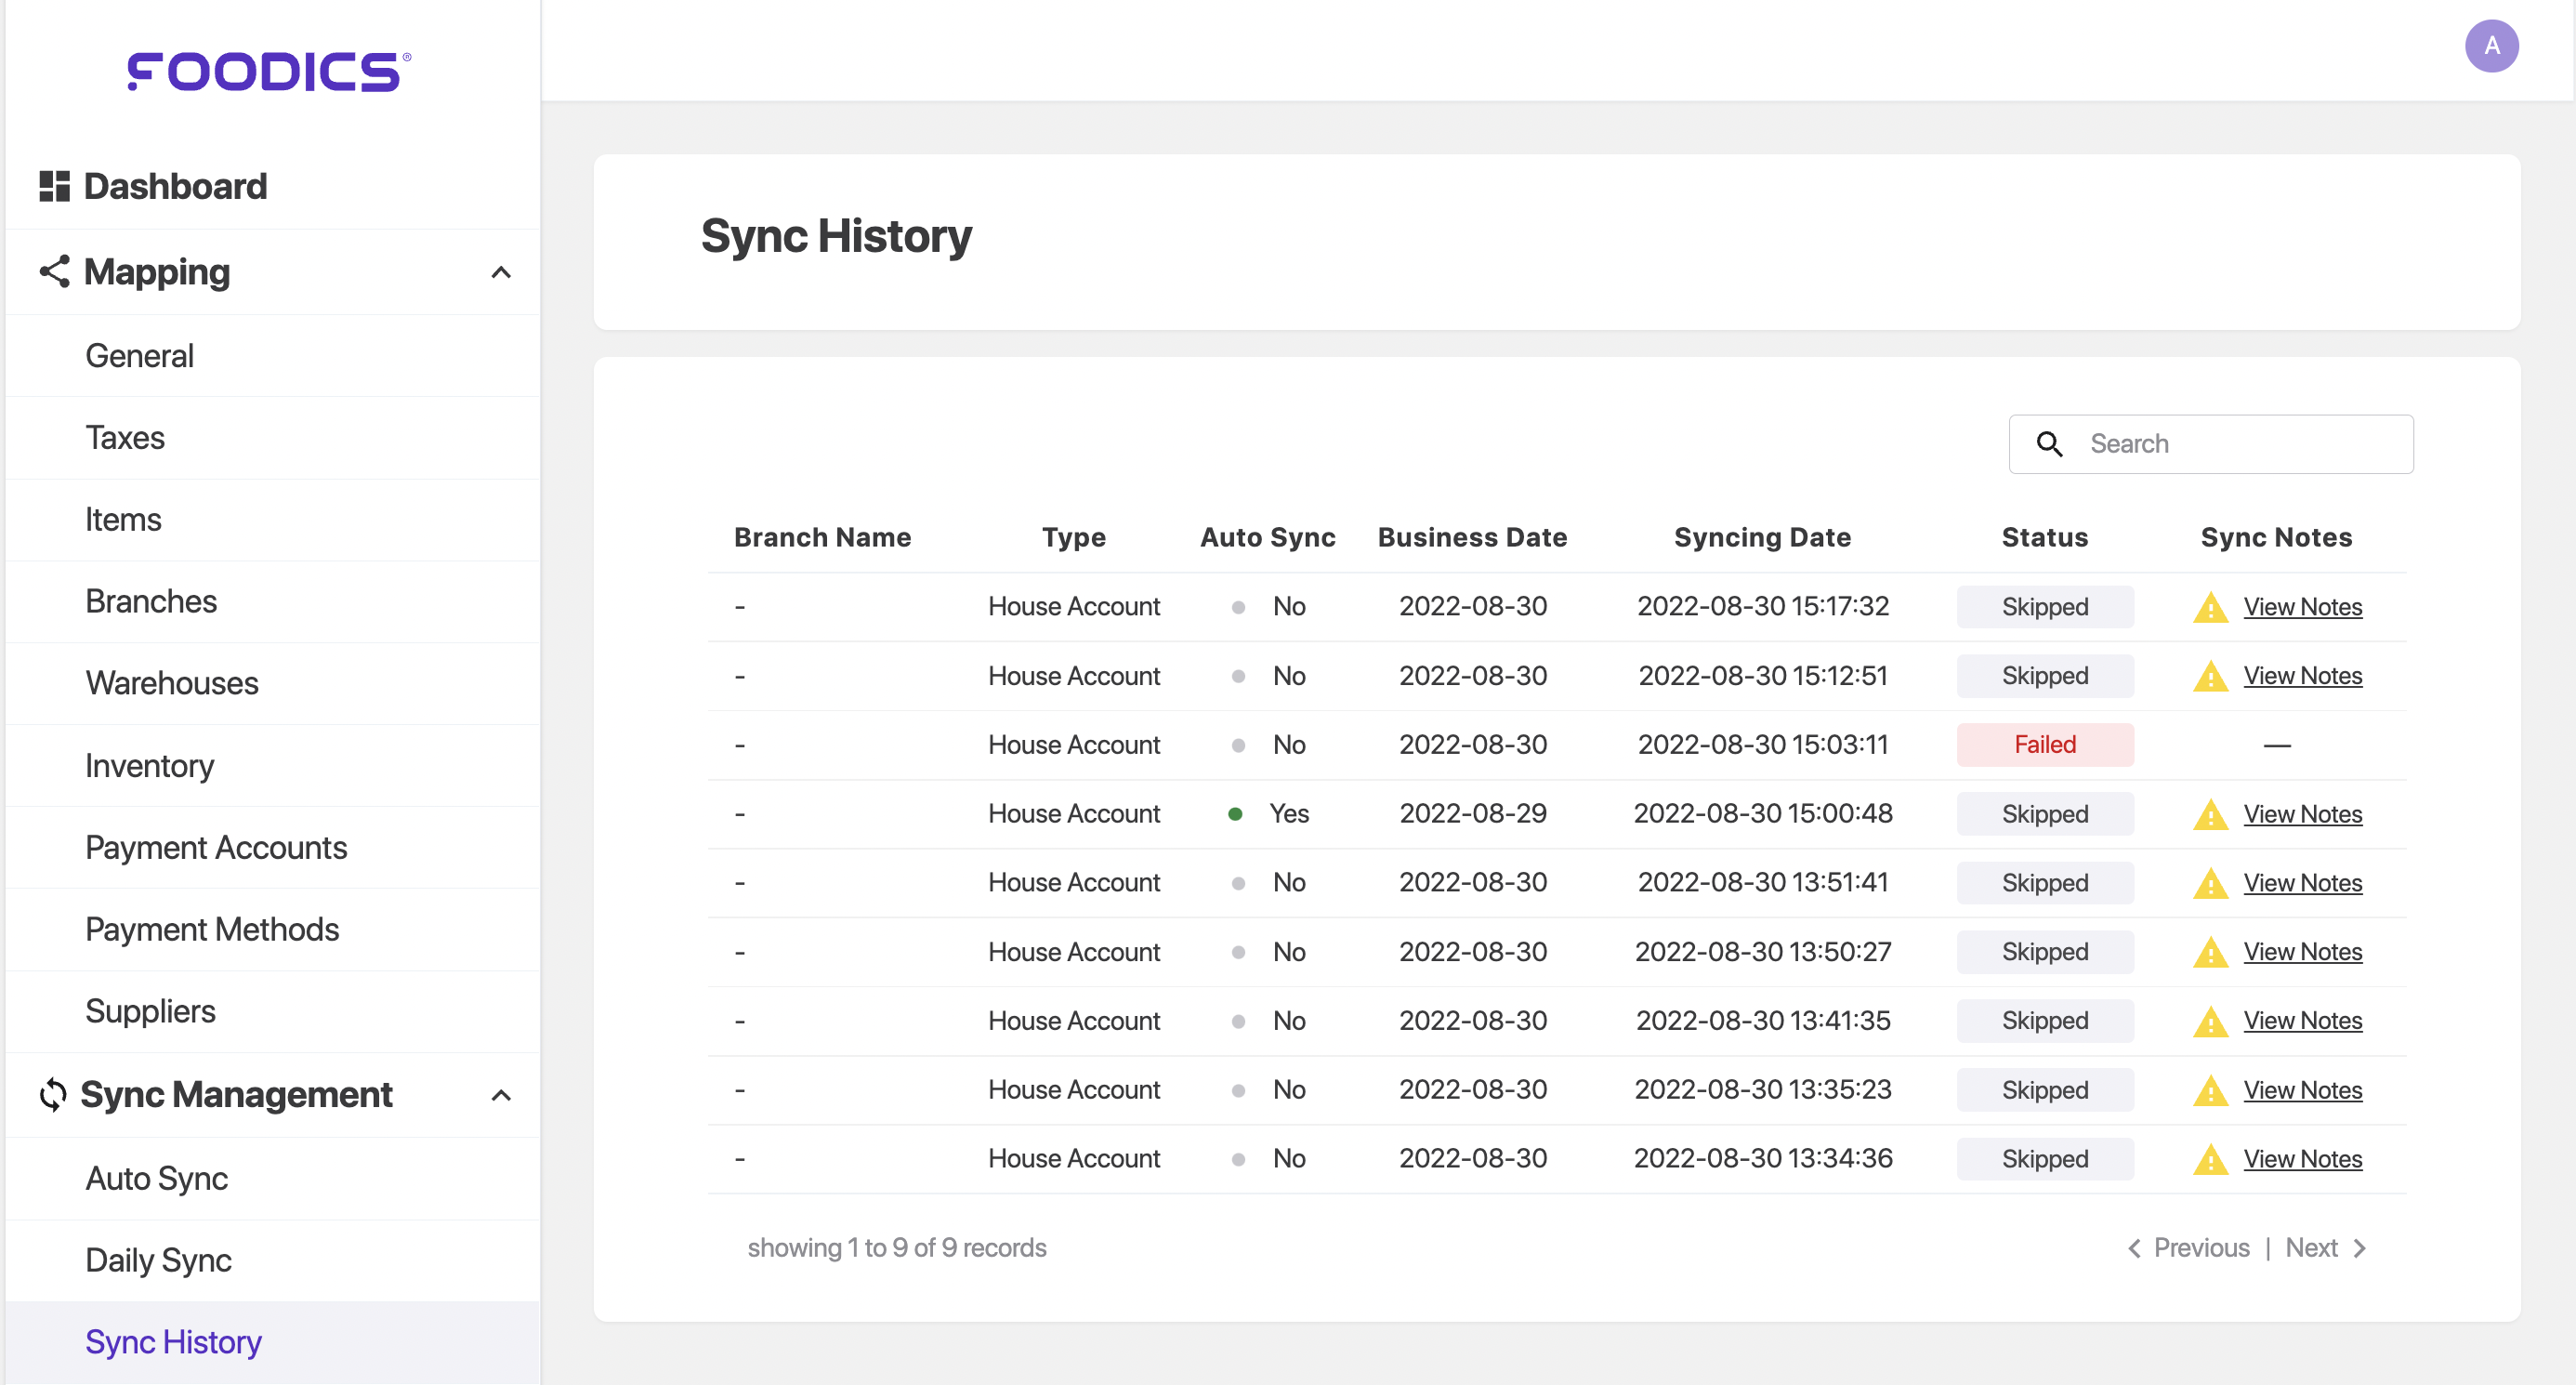
Sync history
Allows you to see the previous syncs that you did, their time, type, status, and the synced branch.
Notes On The Integration
- The integration is suitable for small businesses.
- Ensure all cashiers end day before uploading the data to Xero
FAQ
Q1: I added new entities in Xero but they don't appear in Xero integration settings page, what should I do?
- Click
Refreshbutton on the entities you need to fetch the data for - Now recheck for the newly added entities.
or
- Check in Xero if the wanted entities are
Active
Q2: I was using Xero integration on Foodics V3, do I need to redo the integration on Foodics F5?
You don't need to redo the integration in terms of creating accounts all over again in Xero. You just need to do the mapping in the integration settings for the first time. Just like when you configured the integration for the first time on Foodics V3.
Xero integration on Foodics F5 has introduced
- New sales item (Gift Cards)
- New sync section (House Account)
The guide explains how to configure each of these new additions
Xero integration on Foodics F5 has removed
- Default Vendor
You no longer need to map Default Vendor on F5
Q3: What Timezone do the auto sync follow
It follow your foodics business account timezone.
Q4: can I do my syncs retrospectively?
yes, you can, by using the daily sync feature.
Q5: what should I do if a sync job fails?
before contacting support you need to check if you are facing one of the [Common issues and fixes link]
Common Issues and Fixes
Case 1: Sync Job keep failing (in the sync history)
in this case you need to check if all your fields are mapped, if all the fields are mapped check the below case.
Case 2: the integration page does not fetch my Xero data at all
- on the selected entity hit the refresh button
- if it didn’t work, go to your profile Icon
- click it and hit
logout - on the top right hit the reload button
- reconnect again and the issue should be fixed
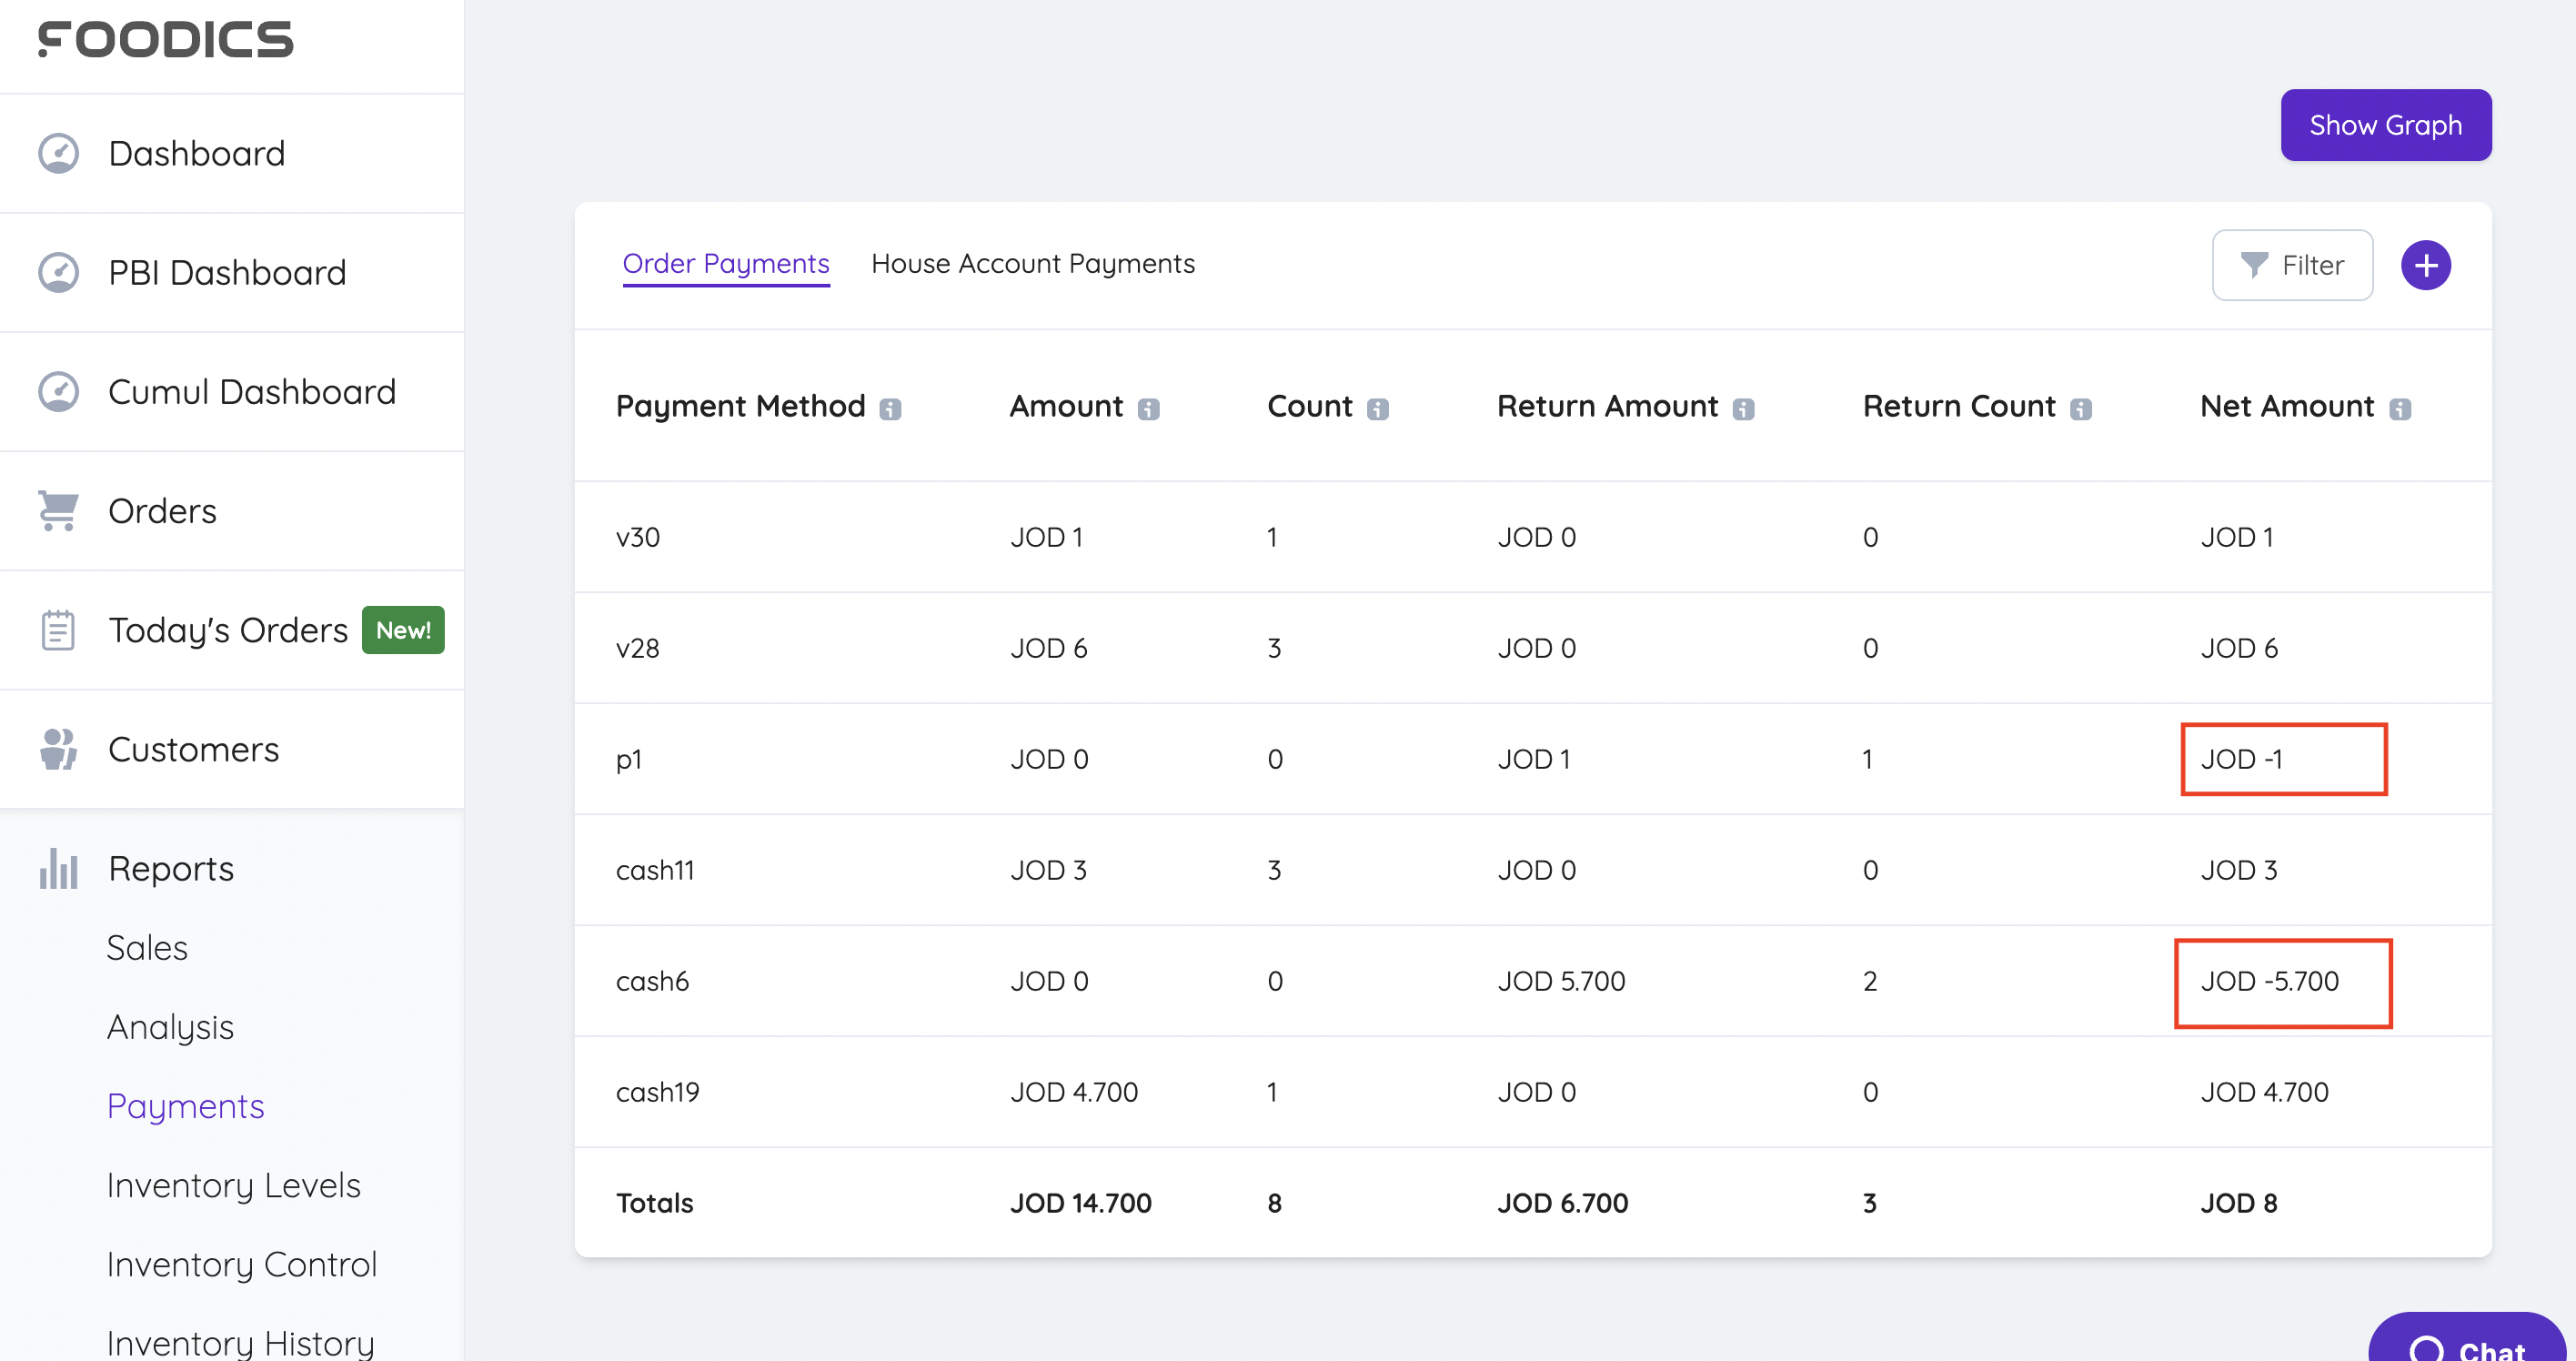
Case 3: Numbers between Foodics and Xero are different, why?
This issue can happen, on specific special cases, you need to check if you are facing one of the below cases:
-
you have negative payment method, to check:
- Go to Foodics account > Reporting > Payment report
- in the business date filter by the synced date
- check if you have any payment method that has negative
Net amount - in this case you need to close your invoice manually since Xero does not accept negative payment methods.
-
you are using Gift cards
- Go to Foodics account > Reporting > Payment report
- in the business date filter by the synced date
- check if you have any payment method
Gift Cards - in this case you need to close your invoice manually using
Prepaymentsin Xero
Note: we don’t send gift cards payments since it is already recorded as sales when the customer bought it, please ask your accountant to create the prepayments.
Case 4: Xero error: Invoice not of valid status for modification
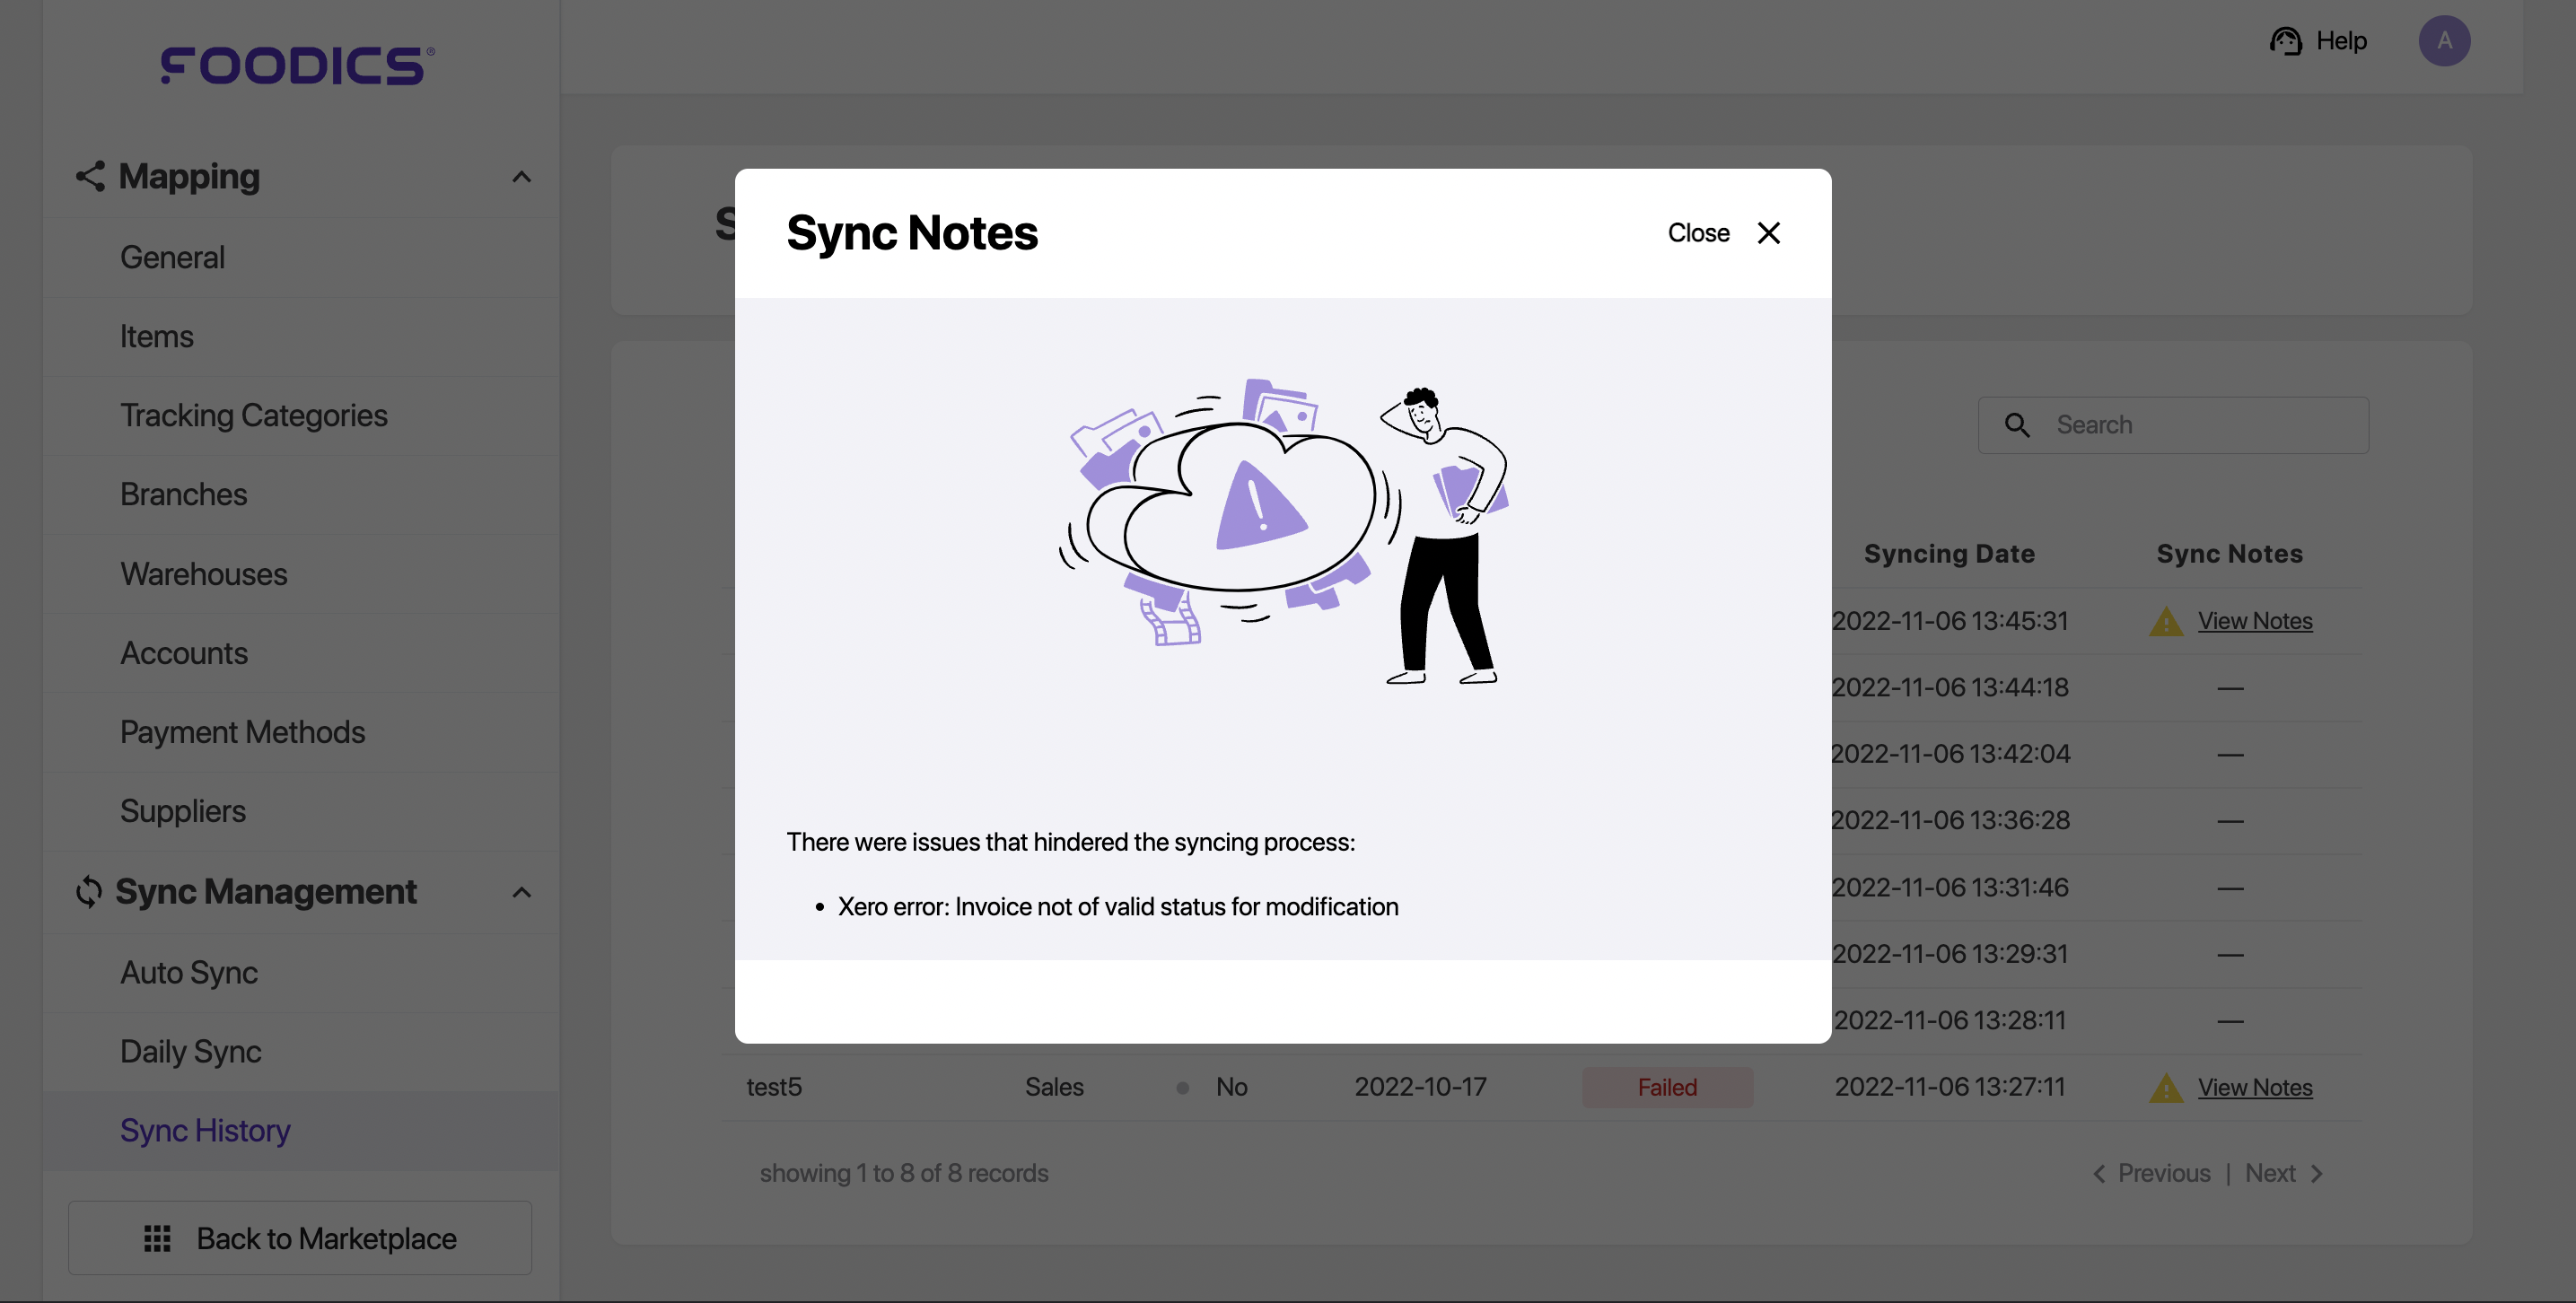 This error means that you have the same invoice Reference number eg: 1 Purchasing PUR-002365 and it's already marked as approved.
How could this happen?
- you manually created an invoice with the same Reference number [eg: 1 Purchasing PUR-002365]. or
- you already synced and approved this date before, but you forget about it (it could happen to any of us)
How to fix this?
Unfortunately, Xero does not allow Approved invoices to be modified (nor foodics does) so changing the reference is not an option.
- you have to identify what is the cause problem, (if you already synced the data or you manually created an invoice with the same reference number)
How to check what is causing the issue?
- Go to Xero > Business > Bills to pay > all
- Search for PUR-002365
- Check if the invoice is manually created or a synced invoice
- based on the results, he either does nothing (if the invoice is already synced and he forgets about it)
- or manually create it with a different reference pattern (ex: man-01)