Introduction
An advanced branded online ordering system for your restaurant!
Go online! Your restaurant can now have its own app and website and you can easily receive orders directly into your Foodics POS thanks to the seamless integration
Own your online presence with your own mobile app and ordering website. Build direct relationships with your customers to insure the right level of service
Benefits:
• Unlimited online orders, commission free.
• Access to TakerGo; Our network of Delivery Service Providers.
• Track your deliveries in real-time and on-the-go.
• Accept online payments and optimize your restaurant operations.
• Build direct relationships with your customers and understand what they are really after.
• Constant support through a dedicated team.
For more details:
- Taker Website at taker.io
- Support email: support@taker.io
Note: You need to have an account in Taker in order to be able to use this integration, if you don't have one, contact Taker to proceed
Pre Requirements:
Menu Group
Taker reads your Foodics menu using a specific menu group that you need to create. Follow the below steps:
1- Create a menu group in Foodics that will be used by Taker
Navigate to Menu page --> Groups --> Create Group --> The menu group name must be Taker
Notes on Menu Group:
- If you didn't name the menu group correctly, Taker will not be able to read it. Instead, it will read your entire Foodics menu
- Combos are not supported in Taker yet, so please don't add combos to Taker Menu Group
2- Once you create the menu group --> click on it --> Add Products
Add all products that you would like to sell through Taker
Note: You need to use the “Fixed Price” option for your products' prices in Taker Group. Otherwise, no prices will be shown in Taker
Delivery Charge
Taker needs you to create a delivery charge in Foodics to be used as Delivery Fee for your Taker orders. Follow the below steps
1- Create the Delivery charge in Foodics
Navigate to Manage page --> More --> Charges --> Create Charge --> Configure it as below image
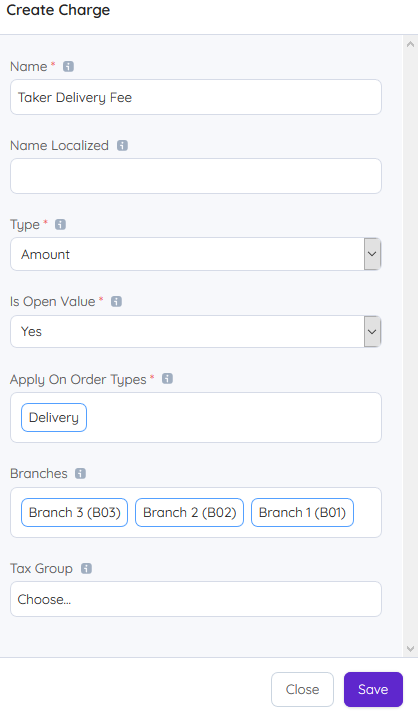
Notes on Charge:
- If you didn't create the charge, Taker will not be able to add delivery fees to your orders
- Make sure the charge name is
Taker Delivery Fee - Assign the charge to all branches that will receive orders from Taker, otherwise, issue will happen in the integration
- If you want the delivery fee to be subject for taxes, assign a tax group to the charge
Enabling The Integration
1- Sign in to your Foodics account at console.foodics.com/login
2- Navigate to Marketplace page --> Search for Taker under Online Ordering category --> Click Install
3- Sign in to your Taker Account. If don't have an account on Taker, contact Taker team to proceed with creating your Taker account
4- Once you sign in to Taker dashboard, go to Addons and Integrations --> Foodics --> F5 Settings
5- You will see a popup with Authorize button --> Click Authorize
6- Foodics will ask for your permission
Click Authorize to proceed
Click Cancel if you want to cancel the process
7- After clicking Authorize, you will be taken back to Taker to configure the integration
8- Select the details you want to integrate from your Foodics account --> Click Integrate to start integrating your Foodics data to your Taker Account
9- Wait for the process to finish, you will see a success message when done
Note: The above part will activate the integration from Foodics side, you will need to contact Taker to configure the integration from their side
How to Receive Taker Orders in Foodics Cashier
Taker Orders will be received as explained in the Accept Online Orders Article
Checking the Integration
In Taker dashboard, check the below:
Branch Information
- Update Working hours
- Check Order types
- Pre-orders settings
- Payment methods
- Delivery fees
- Delivery areas
Menu Information
- Check each branch menu
- Check items' prices
- Items' availability in each branch
- Items' modifiers options
- Update items' pictures
Orders
- Make test orders and make sure they go through to Foodics console and Foodics Cashier App.
- When receiving test order in Foodics Cashier App, change the order status (e.g. Accept the order) and make sure it is reflected correctly in Taker system
Auto Sync
Optional: You can activate Daily Sync between Foodics and Taker. This will make sure that Taker group in Foodics is always reflected in Taker correctly.
Notes:
- Daily Sync is carried out every day at 4:00 AM. if you need to immediately reflect a change in the menu, then you need to re-sync manually.
- The Daily Sync will only be completed on selected entities in the list: Names, prices, working hours... So, unselected checkboxes will not be effected by the Daily Sync.
FAQ:
Q1: Taker is sending orders to my restaurant but I'm not receiving them in Foodics cashier application
A: Please check the below points
1- Sign in to your Foodics account at console.foodics.com/login, then go to Orders Page. This page will show you all API orders that are in Pending status
2- Is there any pending orders from Taker?
If Yes:
- Make sure you have implemented all needed steps to receive online order as explained in the Accept Online Orders Article
- In the cashier app, click
HOME-->Sync Data - Ask Taker to send new orders to test, orders should be received in the cashier
If No:
- There is an issue at Taker side in sending orders to your Foodics account. Please communicate with Taker and inform them that there are no orders created from Taker in your Foodics account